Beginning Python scripting in Grasshopper
- Will

- Jan 7, 2018
- 11 min read
One short post to know all of Python scripting.
Obviously this statement is to get your attention. It is a very tall task to teach anyone with little computer programming knowledge Python language in a short blog post. But metaphorically speaking this post will be that vehicle with a 0-to-60 of 2 seconds you are looking for. In the end you may not become a programmer but you will have the ingredients to start expediting all your familiar designer tasks by learning more text-based programming languages. Also be confident that Python is possibly the easiest text-based programming language out there. You are starting at the right place.
Let’s start with a task. Learning from a case study is usually the fastest way. We want to make a building fin system that has perforations on them. The pattern needs to have a gradient in sizes of the holes. It is very easy to model in Rhino. You can draw 7 circles with increasing diameters. Array each in a column and you have gradient. With a little help from Grasshopper you can parameterize the sizes, spacing and numbers of the array. Now a change of a numeric slider can visualize a different option fast, without the hassle of remodeling all the circles.
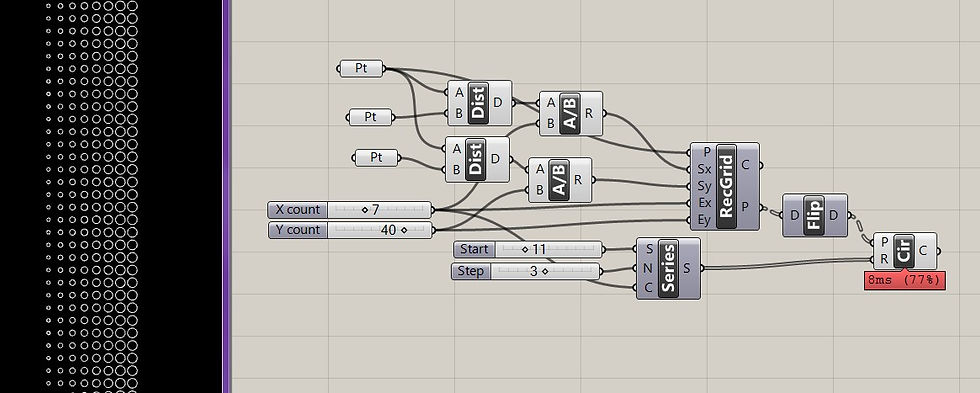
This screen-shot shows how we can set this up with GH components. It relies on the rectangular grid component to create the locations of the perforations. Although the number of perforations per row can be adjusted by dialing the X count slider, there is no ‘live’ correlation between the spacing of the circles to the diameters of them. What if we want to keep a constant distance between the perforations? Right now the distance is farther when the circles are smaller and closer between larger circles. It could be a problem for fabrication when there isn’t enough material between holes. We want more control over it.
Assuming we want 25mm constant distance between holes of each column, the x value of the centers of circles in the columns need to be of an incremental series. If the first column is at 0 and those circles are 22mm in diameter(we are using the slider value shown in the screen-shot, where starting radius is 11 and each next circle’s increases by 3mm), the second column, with increased perforation diameters of 28mm, need to be at x value of 0mm + 11mm + 25mm + 14mm = 50mm. By the same progression, the third column of circles at 32mm diameters will have centers at x-coordinate value of 50mm + 14mm + 25mm + 17mm = 106mm.
See how this is getting recursive? It won’t require recursion in our python code later but in principle the next column of circle centers need to look at where the previous is. This is probably not quite difficult yet to use native GH component to script up but the relationships are getting very wire-heavy, by which I mean the number of connection noodles we have to manage in setting up the GH graph may get out of control. Off the top of my head I can think of the Fibonacci component and the expression component. It can be done with some combination of those but at this point, text-based coding seems more concise and straightforward. Of course that’s only true to those who know the syntax and this is why more designers should learn text-based scripting.

Here is a screen-shot of the python component handling the series. Parameter ‘r’ takes in all the different radii and ‘s’ is for ‘spacing’. The python component in Grasshopper is actually an add-on. Anyone can download it from food4rhino website. The next major release of GH will ship with it as GH is shipped with Rhino 6, but for now we have to load it by hand. Rhino 5 already has a built-in python script editor, but I often find the combination of custom scripting and out-of-box visual programming with GH the most helpful so I use GH python much more often. Also the visual parameter control in GH is quite remarkable. We don’t get that with Rhino’s python editor.
Below is what’s inside that python component. To access the source code, we can double click on the python component that’s on the GH canvas, just like how we would get inside a cluster. The first three lines of the code are declarations of variables. A variable is just a thing with a name in the computer. Once declared, the computer knows that it exists. You can make references to it later. Variable assignments/declarations are made with the ‘=’ symbol. As in line 2, a thing called ‘x’ is assigned the value of 0. Later if we give the computer an instruction such as, in human language, ‘add 5 to x’, that means ‘add 5 to 0’. We can assign something else to the result of it so it would look like this ‘newnumber = x + 5’. Now this thing ‘newnumber’ has value of 5, and x still is 0.
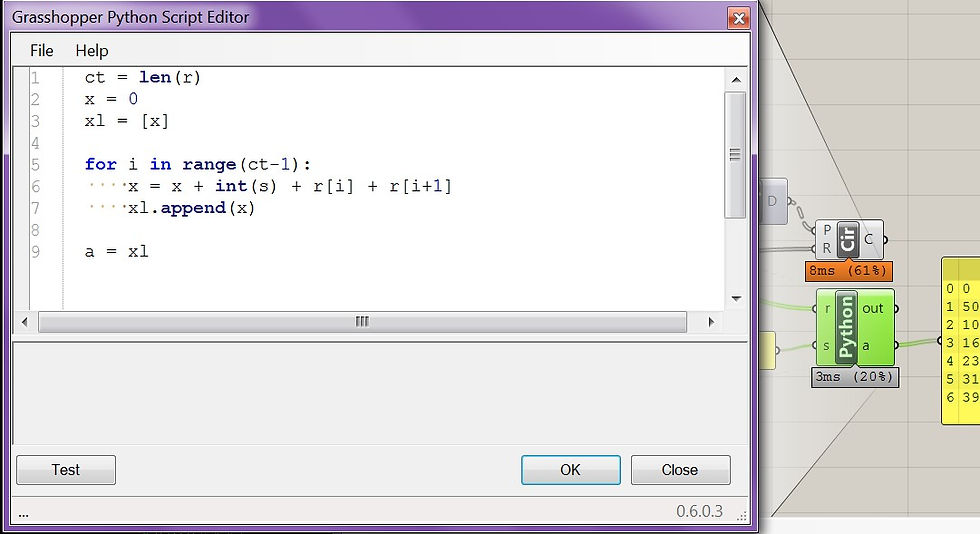
The third line assigns a list to a variable. A list in python is a collection of values. It is denoted by ‘[]’. This ‘[]’ by itself means an empty list. Line 3 has ‘[x]’, meaning that the variable ‘xl’ is assigned a list that has one item(x, which is 0) in it. Similarly, if we type ‘[1,4,3,5,1]’, it means a list containing those 5 numbers. If we type ‘newnumber = xl + 5’, the computer will throw an error at us. It doesn’t know how add a number and a list. An analogy would be to comb a wallet. The action and the object are incompatible. However if we type ‘newnumber = xl + [5]’, the computer knows that you are adding two lists. It will combine them so ‘newnumber’ is a list of two numbers, namely 0 and 5 now.
Line 1 is declaring a variable ‘ct’, short for count, and it has the value of the length of the list ‘r’. Remember the component has a parameter ‘r’ that has a noodle coming in? We can use ‘r’ now in the scripting window. Any variable needs to be declared and assigned, either in the python script editor or on the component. If there isn’t an ‘r’ parameter on the component, this script will spit out an error because it doesn’t know what we mean by ‘r’. It is defined nowhere. Like some of the components in GH, if you zoom in closer on the canvas, there will be additional ‘+’ and ‘-‘ marks on the python component to add/delete variables.
The notion ‘len(r)’ calls a function. ‘len()’ is one of the pre-defined functions of python. You can use it on things that you want to know the length. In our example we want to know how many items are in ‘r’ so we call ‘len(r)’. You can understand functions as a set of operations. It is identified by the name like ‘len’ and the parentheses wraps around the object to undergo that set of operations. So theoretically if there is a function called ‘BoilEgg’, and it operates on one object, you can call ‘BoilEgg(myDuckEgg)’ and it will boil the duck egg. Sometimes functions need to know more than just an object. You will see something like ‘BoilEgg(myEgg, 5)’. There are two things within parentheses. These are parameters. Just like all the different inputs on GH component’s left hand side. Now the ‘BoilEgg’ function knows that you are boiling ‘myEgg’ for 5 minutes.
Python has some built-in functions but limited in what they can do. Please see reference for how you define your own function. You may actually define a function called ‘BoilEgg’. For now just remember if you want to call a function, make sure to have the parentheses after it, even if a function doesn’t take in any parameters. Something like ‘exit()’ would exit the current program. Just typing ‘exit’ or ‘BoilEgg’ without the parentheses means you are simple making a reference to the function itself as an object, as a thing per se. No execution.
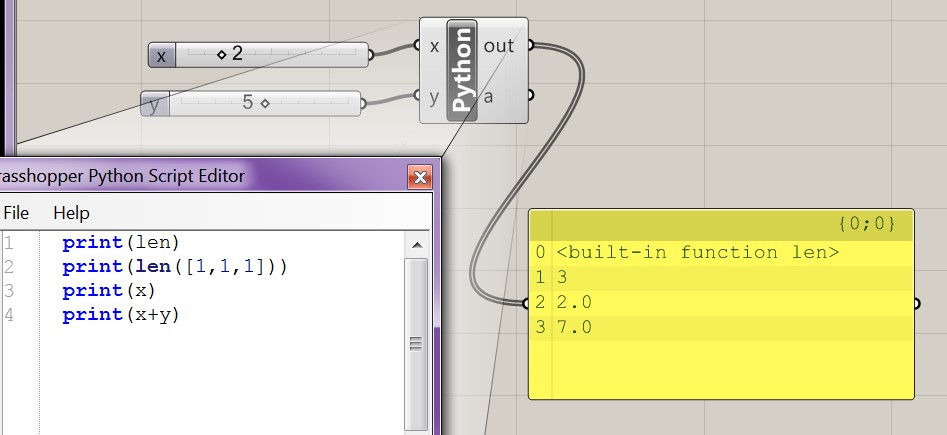
Here is a good place to introduce the ‘print()’ function. It is a tremendous help in monitoring and troubleshooting codes. It will virtually print text information to the ‘out’ of the component. See screenshot above for examples. The first line in this snippet in fact prints the text representation of a function object. ‘len’ is not followed by ‘()’ so the function isn’t called/executed to give us any results, whereas line 2 actually gives us the length of that created-on-the-spot list.
Back to our pattern script, line 5 to 7 is very useful. It is a loop, meaning it is doing something in repetition until some condition is satisfied and it will then move on. Quite literally, line 5 means ‘for every item (given a temporary variable name i) in the collection range(ct-1), do what’s after the colon.’ Assume we have a banana bunch and we want to peel them one by one into four strands. It may be written in python as something like this, assuming the right variables and functions are defined already elsewhere in the code:
for banana in bananaBunch:
detach(banana)
peel(banana,4)
The indent on lines after the semicolon is important, as it signifies the scope of the statement before. All lines with the indent will be executed as the computer loops through every banana on the bunch. First line without the indent will be executed after the looping is finished.
‘range()’ is another pe-defined function of python. It can take more than one parameters but at the moment let’s say it takes in just a number like our example. The function will spit out a list of numbers starting from 0 all the way to just before the number in parentheses. So ‘range(5)’ yields [0,1,2,3,4]. Our example ‘range(ct-1)’ is ‘range(6)’, or effectively [0,1,2,3,4,5]
‘xl’ in our example is the list of x coordinates of the circle centers. We already put the first, which is the current x value 0, in it when we declared it. So in the loop, we want the actions repeated one fewer time than the length of ‘r’. The actions calculate a new x coordinate and add it to the list ‘xl’, meanwhile updating the current ‘x’ to be the new ‘x’ so the next one can work off of it. Line 6 is the code updating x value and line 7 adds this number to ‘xl’. Now the code goes back to the top of the loop and execute line 6 and 7 again but newer x values are generated and appended to ‘xl’. Hence the recursion. Looping and recursion are two of the biggest added benefit of custom scripting in GH, as native components lack such mechanisms.
Each time the loop restarts, temporary variable ‘i’ goes down the list ‘range(ct-1)’ and takes on the next value. In our example the first time the loop executes, ‘i’ is 0. The third time it’s 2. Last run it’s 5. Then the loop ends. This is relevant when we consider line 6. The notion ‘r[i]’ is a subscription. We know ‘r’ is a list. If we follow a list immediately with a bracket that has a number in it, we are calling out the value at that number index. Assume we have a list ‘mylist’ of [1,5,3], the notion of ‘mylist[0]’ will give us 1, ‘mylist[1]’ 5, and ‘mylist[2]’ 3. Index in programming languages starts with 0. The first item in any collection is at index 0, not 1. So an index 37 means the 38th item.
The first time our loop runs through, ‘i’ being 0, line 6 will add the current x value, 0, to the first value in r, noted by ‘r[i]’, which is ‘r[0]’, and to the second in r, noted by ‘r[i+1]’. Then we also need to add the gap distance 25, which is input as ‘s’ on our python component. It is allowed to update a variable with reference to itself. When we use the statement ‘x = x +1’, the x on the right side of the equation will look to the old value. After this line of code, x will be updated and any more reference will be to the new value. Python execution is line by line so what happens first must be typed first, usually.
Now we have the second x coordinates. Line 7 adds this to ‘xl’ by calling a method of the list. A method is just a function, but associated with other objects. We are writing the code as ‘xl.append(x)’ because ‘append’ is a function associated with lists. It can be called on any list. The syntax is a period/dot. If we have a list ‘mylist’ and call the method on it as ‘mylist.append(12)’, the number 12 will be added to the end of the ‘mylist’. Some functions are called independently like ‘len()’, others are called after some object with the period syntax. Our banana bunch example can now be re-written with the new syntax.
for banana in bananaBunch:
bananaBunch.detach(banana)
banana.peel(4)
The last unknown symbol is the ‘int(s)’. Should we just use ‘s’? It is a variable and it is defined by the component. It has a value of 25. Why ‘int()’?
‘int’ is short for integer, one of many data types of python. Numbers are a type and so are lists. Data types cannot mix. As mentioned above, mathematic addition cannot work on a list and a number. Combs are for hair and they have not much to do with wallets. So when we pass in the 25 from a GH panel, it comes in as a string, the nomenclature for texts in python. A string is a dead object as far as math is concerned. A string 25 is no different than the word cake. Cake + 5 makes little sense, unless 5 is also a string. Plus signs can concatenate texts. Quotation marks denote strings in python. Therefore if we type ‘cake’ + ‘5’, we are getting ‘cake5’. Similarly, ‘25’ + ‘5’ would be ‘255’.
Data types can sometimes be converted to each other, as in the case of our example. ‘int(s)’ is converting the string into an integer. It will fail if we try something like ‘int(“Tom”)’ because the string is actually of letters. Also single and double quotation marks can both denote string and if a string itself has quotation marks we can alternate. For example:

Some of the most common data types in python include string, int (integer), float (floating point decimals like 0.56 or 11.2), list, tuple, dictionary, and so on. Data types can be custom made. Python in Rhino environment has curves, surfaces, etc. as data types. They come with unique properties and their own methods, which are called by the period (‘.’) notation.
We see the python script we write generates just one x coordinate too short than the original matrix of circles. After all we are using the ‘range(ct-1)’. The missing piece is to add line 6 and 7 again outside the ‘for’ loop, only replacing the r[i] and r[i+1] with r[-1] and r[-2]. In python programming, the negative numbers are indices counting backwards. So -1 means the last item in a collection, -2 the second till last.
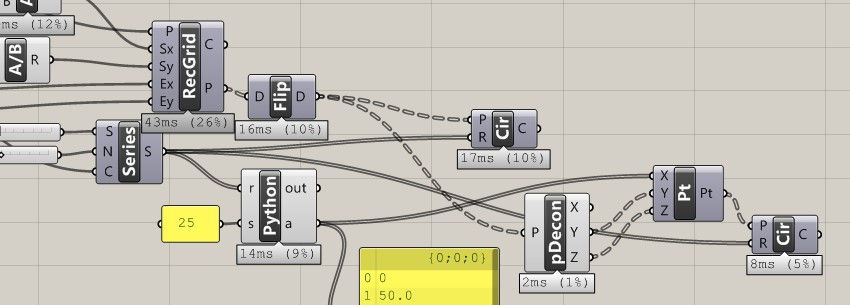
Now if we use the point grid matrix to get all the y and z values (z is always 0 cuz this is 2D), we can use the python generated x values. Notice the spacing between circle perforations is consistent, whereas before the centers of circles are evenly spaced.
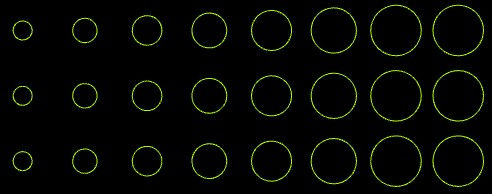

Python scripting isn’t necessary to achieve this. With careful calculation and planning, native Grasshopper components can produce this pattern just as fast. However, I doubt the visual syntax can be as succinct as the few lines of code in python in creating a somewhat recursive logic.
At this point the python has completed our task. There are many open ends such as the number of columns. Since we have effectively squeezed the circles closer together, what if there is too much space left on the right? X-coordinates are coded to have 25mm inter-circle spacing but what about Y coordinates? If we alter the x and y coordinates, how can we do a dense-pack with incremental circle diameters? These are questions for another day. There is also the ‘while’ loop in python, which is a ‘for’ loop without the prescribed number of iteration but rather a condition that needs to be met. Also conditional statements are very common, although GH has logic gates that do the same thing, only with messier noodle wires.
The single most useful reference material that I’ve found is the Rhino Python Primer available free of charge from McNeel. It not only goes through basic programming syntax but also uses loads of examples that take place in Rhino. It’s a quick way to situate the programming language in our design sphere. I do however recommend also taking one of the free online courses at Coursera or Code Academy. These will approach the topic in the more fundamental way in which one can learn the concept of computer programming. We usually have to learn to walk before we know how to run. Using python scripting in the Rhino environment is like running. At last I’m putting my example file here so you can take a closer look.
This post turns out to be a little longer that it promised to be, only because I wanted to explain every little thing in my script. Although this is just the very surface of python programming, we did enough to “open the door”. The best learning practice is to take what we learn and apply them in similar situations where new things are exposed. Those will in turn encourage us to learn even more. Before you know it, the knowledge and skills set in.
Now declare some variables and use a ‘for’ loop to incrementally alter their values!
Comments